BQ Settings Convert and Transfer Utilities
Introduction
The BMS needs the ability to store settings and to transfer them to the BQ chip (battery management IC on the BMS). Those settings are stored in the BMS’s on-board EEPROM and are loaded onto the BQ chip at system startup. The BMS itself, however, needs a way to get the settings in the first place. Therefore, included in this codebase are utilities for converting BQ settings into a format that can then be transferred to the BMS as well as a utility for sending those settings over to the BMS. The intention is to provide a replicatable process for taking in new settings and updating the BMS.
Background
The BQ chip is a TI product with the ability to operate under a wide range of applications. As such, the BQ chip is highly configurable. The majority of the settings are stored in the BQ chip “RAM” or “Data Memory”, however the BMS software was designed to also support configuration through commands and subcommands. Each time the system starts up, the BQ chip must have all of its settings sent over. The BMS handles the logic of transferring the settings to the BQ chip, but it still needs to be sent of the settings at least once to be stored in non-volatile memory (EEPROM). In order to accomplish this, the settings for the BQ chip must be converted into a form that can then be sent over CANopen to the BMS as well as be saved into EEPROM. The format of the data is described in BQ Setting Representation.
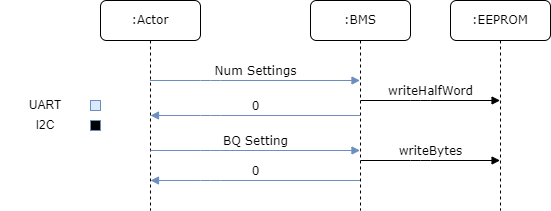
The general flow of how the settings are transferred to the BMS is shown in the diagrams below.
CANopen

Human Process Description
Users of these utilities will be converting the TI settings file into the BMS-recognized format. From there, additional instruction will be provided on how the user can transfer those settings to the BMS itself. The TI settings file contains the settings that will be applied to the RAM of the BQ chip. Additionally, the settings file itself contains information on each setting, including the type of data, the units, the size in bytes, and how to convert from a human readable format into the BQ expected format.
The user of the utility does not have to know the intricacies of the TI settings file but should be aware of its function. Further information on how to generate the TI settings file can be found in Section 3 of the Easy Configuration of BQ76942, BQ76952 Battery Monitors document. Additionally, documentation on the settings themselves and how they apply can be found in Section 13.1 of the BQ76952 Technical Reference Manual. The selection of the settings values themselves is beyond the scope of this document, but again, understanding the origin of the data can prove useful.
The utilities themselves are Python3 scripts with a command line interface. Users will interact directly with the scripts in order to execute the conversion logic as well as the transfer logic. The remainder of this document will go over the specifics of interacting with these scripts.
Training Module
Target Population
Users of the utility are expected to have some level of confidence running Python scripts and using command line tools. The utilities conform to standard practices and leverage the package “argparse” so users with a background in command line usage should be able to use the utilities with ease.
With those considerations in mind, users of this code are expected to be either firmware members working with an electrical engineer team member, or an electrical engineer team member who is comfortable working at the command line.
Objective
The goal of this manual is to give users the knowledge necessary to convert TI settings into a binary format which can then be transferred to the BMS. This will focus on the scripts included in the utility. Focus will not be on the format of the data, the meaning behind the settings, nor on the specifics of the implementation. For more of the specifics on the BQ chip, refer to the corresponding documentation.
Criteria
The only criteria for executing this script is that the settings are verified to be the correct ones to send to the BMS. This should be done by a lead electrical engineer for the BMS project. Failure to apply the correct settings could lead to damage of the BMS or the battery it is used with.
Task Listing
Using the provided convert utility to convert the settings from TI to binary
Using the transfer utility to send the settings out over CAN
Using the convert utility to convert TI settings into an intermediate CSV format.
Using the convert_transfer utility to convert the setting from TI to binary and send out over a serial connection in one step.
Module
Getting Started
First users will need to install the required Python packages in order to execute the utilities. It is assumed that the user has Python3 already installed on their system.
To install the additional Python packages, navigate to tools/bqsettings and run the command below. Note, it is recommend to use a Python virtual environment or similar to keep environments clean.
pip install -r requirements.txt
From here, users should be able to execute the utilities. Users can verify this by executing the command below.
python run.py --help
Converting to Binary
Conversion to binary is executed with the convert command passed to the
run.py script. To see the options available, users can pass the “help”
flag resulting in the output below.
$ python run.py convert --help

usage: run.py convert [-h] [--target {binary,csv}] input output

positional arguments:
    input                 The file that is going to be converted into either binary or
                         the intermediate CSV format. This can either be the TI provided
                         file, or the intermediate CSV format itself.
    output                The destination to save either the binary format or the CSV
                         data

  optional arguments:
    -h, --help            show this help message and exit
    --target {binary,csv}
                         The target format, either binary or CSV, defaults to binary
To convert a file from the TI format to binary, the command below can be used as an example.
python run.py convert default.gg.csv output.bin
Note the file extension on the input. TI files have the extension .gg.csv
which must be maintained for the script to execute properly. After executing
the script, a file output.bin should be produced with the contents being
the binary representation of the data.
Transferring the Settings over CAN
Transferring the settings can take place via any method that allows sending binary data over the CANopen network. The approach detailed below utilizes the provided Arduino code to have an Arduino facilitate sending the data over the CANopen network. Users can also utilize tools such as VectorCAN to send the settings over. In the case of using another tool, users must first make an SDO request to the BMS updating the number of settings before sending the settings themselves over in a segmented SDO (which VectorCAN supports via the binary file produced by the conversion script executed above). Note, the use of third party tools is beyond the scope of this manual, but their existence is noteworthy.
First, users need to flash the Arduino code to an Arduino device with a
compatible CAN shield. The code is located in tools/bqsettings/arduinoTransfer.
Resources for programming an Arduino are available online.
The help output for the transfer command is shown below.
$ python run.py transfer --help

usage: run.py transfer [-h] input port

positional arguments:
    input       The binary file containing the settings to transfer
    port        Port of the Arduino to send settings to

optional arguments:
    -h, --help  show this help message and exit
When transferring the settings, the user must provide the binary file of settings and the port of the Arduino. Below is an example usage of the script.
python run.py transfer output.bin /dev/ttyUSB0
Users can determine which port to use for the Arduino using the Arduino IDE.
Converting to Intermediate CSV
Users also have the ability to convert the TI settings into an intermediate CSV format, then convert the intermediate CSV format into binary. This gives users the opportunity to insert additional settings into the CSV before converting the settings into binary. Below is an example execution of the script to convert the data to CSV.
python run.py convert default.gg.csv output.csv --target=csv
At this point, the user can add settings to the output.csv then run the
command below to convert the CSV into binary.
python run.py convert output.csv output.bin
Converting and Transferring over UART
With revision 3 of the BMS, UART was exposed, so we were able to start using that interface for transferring settings instead of CAN. Because UART is a simpler method of communication, this is generally the preferred method of transferring settings to the BMS.
To get started, all you’ll need is a BMS, a BMS battery power source, an
STLink-v3 Mini, and your laptop. Connect the STLink to your computer and the
BMS, and carefully plug the BMS in. In STM32CubeProgrammer, confirm that you are
able to connect to the microcontroller. Next, confirm that you have the Python
scripts ready by get the help message for the convert_transfer command.
Below is some example output.
$ python run.py convert_transfer --help

usage: run.py convert_transfer [-h] input port

positional arguments:
  input       The TI file containing the settings to transfer
  port        Serial port connected to the BMS

optional arguments:
  -h, --help  show this help message and exit
Once this is working, you can begin the transfer process by following these steps:
Open a command prompt and navigate to
BMS/tools/bqsettings.Compile and flash
uart_settings_uploadto the BMS.Within 10 seconds, run `` a. This 10-second time limit is caused by a limitation of EVT-core. It should be fixed in future development.
Wait for all settings to be sent to the BMS and written to the EEPROM.
To confirm that settings have been sent successfully and that they don’t cause issues with the BQ chip, perform the following steps:
Compile and flash bq_interface to the BMS.
Confirm that you have communication with BQ chip (‘v’).
Transfer settings from the EEPROM to the BQ chip (‘t’).
Check if you have communication with the BQ chip (‘v’).